Nextflow plugins
Nextflow's plugin system allows you to extend the language with custom functions, executors, and more. In this side quest, you'll learn how to use existing plugins and optionally build your own.
Development sections are advanced
Using existing plugins (sections 1-2) is straightforward and valuable for all Nextflow users.
However, developing your own plugins (sections 3 onwards) is an advanced topic. It involves Java/Groovy programming, build tools, and software engineering concepts that may be unfamiliar if you come from a pure bioinformatics background.
Most Nextflow users will never need to develop plugins - the existing plugin ecosystem covers the vast majority of use cases. If development sections feel challenging, focus on sections 1-2 and bookmark the rest for later.
Learning goals
In this side quest, you'll learn how to use existing Nextflow plugins and optionally create your own.
By the end of this side quest, you'll be able to:
Using plugins (sections 1-2):
- Understand what plugins are and how they extend Nextflow
- Install and configure existing plugins in your workflows
- Import and use plugin functions
Developing plugins (sections 3-10):
- Create a new plugin project
- Implement custom functions and trace observers
- Build, test, and distribute your plugin
Prerequisites
Before taking on this side quest, you should:
- Have completed the Hello Nextflow tutorial or equivalent beginner's course
For plugin development sections (3 onwards):
- Have Java 17 or later installed (check with
java -version) - Have basic familiarity with object-oriented programming concepts
Development environment
This side quest requires Java and Gradle for building plugins. The training Codespace comes with Java pre-installed.
What are Java, Groovy, and Gradle?
If these terms are unfamiliar, here's a quick primer:
Java is a widely-used programming language. Nextflow itself is built with Java, and plugins must be compatible with the Java runtime.
Groovy is a programming language that runs on Java and is designed to be more concise and flexible. Nextflow's DSL is based on Groovy, which is why Nextflow syntax looks the way it does. Plugin code is typically written in Groovy.
Gradle is a build tool that compiles code, runs tests, and packages software. Think of it like make but for Java/Groovy projects. You don't need to understand Gradle deeply - we'll use simple commands like ./gradlew build.
The good news: you don't need to be an expert in any of these. We'll explain the relevant concepts as we go.
0. Get started
0.1. Open the training codespace
If you haven't yet done so, make sure to open the training environment as described in the Environment Setup.
![]()
0.2. Verify Java installation
Check that Java is available:
You should see Java 17 or later.
0.3. Move into the project directory
0.4. Review the materials
We have a simple greeting pipeline and materials for both using and developing plugins.
0.5. What we'll cover
- Using plugins (sections 1-2): Understand plugin architecture and use existing plugins like
nf-hello - Building a plugin (sections 3-10): Create
nf-greetingwith custom functions and observers
0.6. Readiness checklist
- My codespace is running
- Java is installed (required for plugin development sections)
1. Plugin architecture
Before diving into plugin usage and development, let's understand what plugins are and how they extend Nextflow.
1.1. How plugins extend Nextflow
Nextflow's plugin system is built on PF4J, a lightweight plugin framework for Java. Plugins can extend Nextflow in several ways:
| Extension Type | Purpose | Example |
|---|---|---|
| Functions | Custom functions callable from workflows | reverseString() |
| Executors | Custom task execution backends | AWS Batch, Kubernetes |
| Filesystems | Custom storage backends | S3, Azure Blob |
| Trace Observers | Monitor workflow execution | Custom logging, metrics |
As you can see, plugins are much more than just custom functions - they can fundamentally extend how Nextflow works.
1.2. Why use plugins?
You can define custom functions directly in your Nextflow scripts, so why use plugins?
| Approach | Best for | Limitations |
|---|---|---|
| Local functions | Project-specific logic | Copy-paste between pipelines, no versioning |
| Plugins | Reusable utilities | Requires Java/Groovy knowledge to create |
While custom functions are the most common plugin use case, remember that plugins can provide much more - observers, executors, and filesystems.
Plugins are ideal when you need to:
- Share functionality across multiple pipelines
- Distribute reusable code to the community
- Version and manage dependencies properly
- Access Nextflow internals (channels, sessions, lifecycle events, etc.)
- Integrate with external infrastructure (cloud platforms, storage systems)
Takeaway
Plugins extend Nextflow through well-defined extension points - not just functions, but observers, executors, and more. They're ideal for sharing reusable functionality across pipelines and the community.
What's next?
Let's see how to use existing plugins before we build our own.
2. Using existing plugins
Nextflow has a growing ecosystem of plugins that extend its functionality. Let's see how to discover, install, and use them.
This is the most important section for most users
Even if you never develop your own plugin, knowing how to use existing plugins is valuable. Many powerful features - like input validation with nf-schema - come from plugins. If plugin development seems daunting, focus on mastering this section first.
Official documentation
This section covers the essentials of using plugins. For comprehensive details, see the official Nextflow plugins documentation.
2.1. Discovering plugins
The Nextflow Plugin Registry is the central hub for finding available plugins. Browse the registry to discover plugins for:
- Input validation and samplesheet parsing
- Cloud platform integration (AWS, Google Cloud, Azure)
- Provenance tracking and reporting
- Notifications (Slack, Teams)
- And more
Each plugin page in the registry shows:
- Description and purpose
- Available versions
- Installation instructions
- Links to documentation and source code
You can also search GitHub for repositories with the nf- prefix, as most Nextflow plugins follow this naming convention.
2.2. Installing plugins
Plugins are declared in your nextflow.config file using the plugins {} block:
Key points:
- Use the
idkeyword followed by the plugin name - Specify a version with
@version(recommended for reproducibility) - Nextflow automatically downloads plugins from the plugin registry
2.3. Importing plugin functions
Once a plugin is installed, you can import its functions using the familiar include syntax with a special plugin/ prefix:
This imports the samplesheetToList function from the nf-schema plugin, making it available in your workflow.
2.4. Example: Using nf-schema for validation
The nf-schema plugin is widely used in nf-core pipelines for input validation. Here's how it works in practice:
The samplesheetToList function:
- Reads the input CSV file
- Validates it against a JSON schema
- Returns a list of validated entries
- Throws helpful errors if validation fails
This pattern is used extensively in nf-core pipelines to ensure input data is valid before processing begins.
2.5. Popular community plugins
Here are some useful plugins available in the Nextflow ecosystem:
| Plugin | Purpose |
|---|---|
| nf-schema | Input validation and samplesheet parsing |
| nf-prov | Provenance reporting (RO-Crate format) |
| nf-wave | Container provisioning with Wave |
| nf-amazon | AWS integration (S3, Batch) |
| nf-google | Google Cloud integration (GCS, Batch) |
| nf-azure | Azure integration (Blob Storage, Batch) |
| nf-cloudcache | Cloud-based caching for distributed execution |
2.6. Plugin configuration
Some plugins accept configuration options in nextflow.config:
plugins {
    id 'nf-schema@2.1.1'
}
// Plugin-specific configuration
validation {
monochromeLogs = true
ignoreParams = ['custom_param']
}
Each plugin documents its configuration options. Check the plugin's documentation for available settings.
2.7. Try it: From local function to plugin
Let's see the difference between a local function and a plugin function in practice.
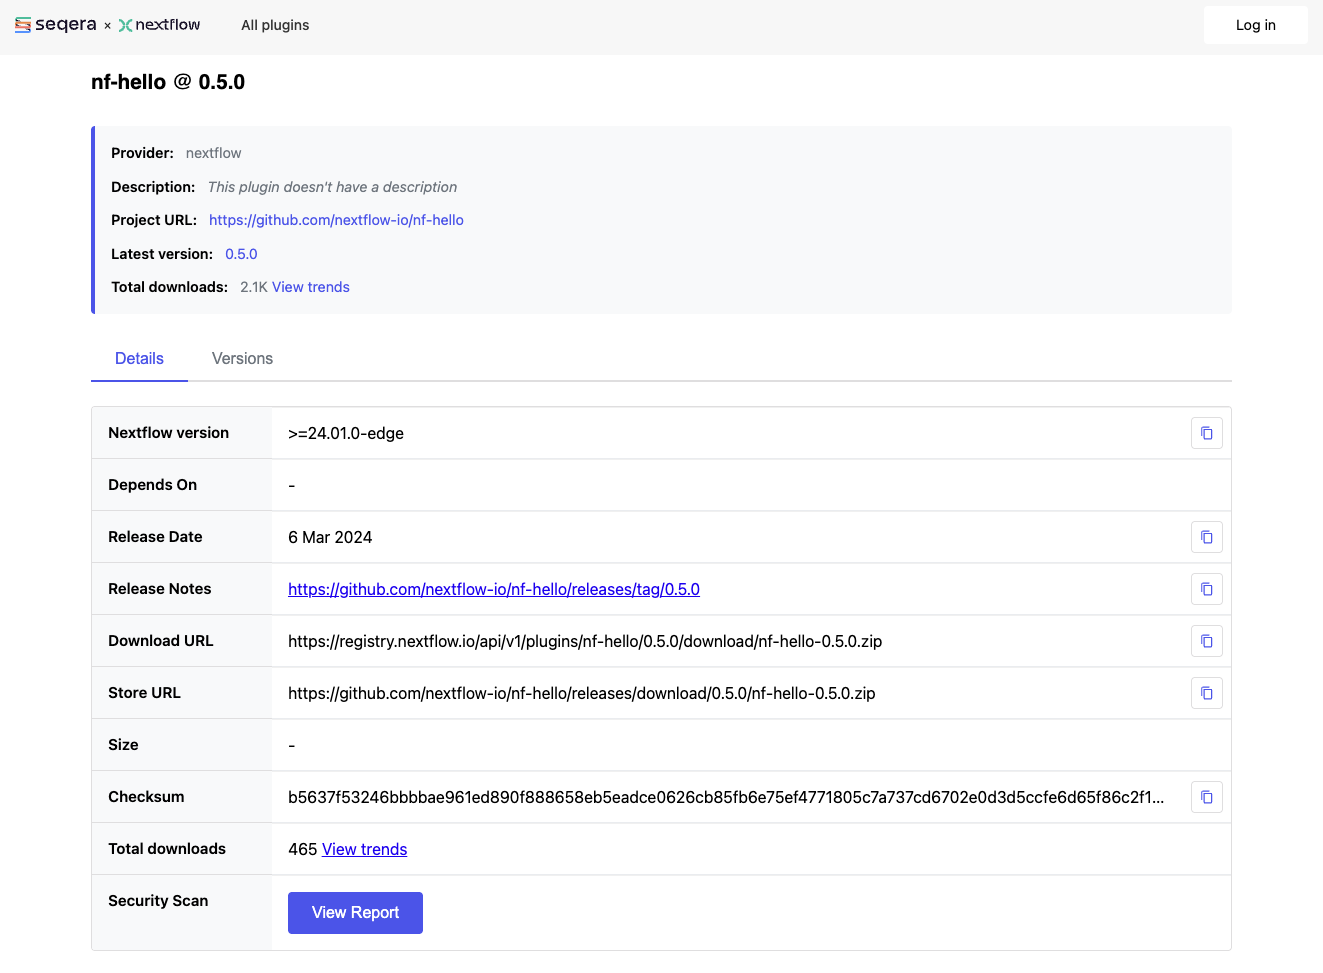
The nf-hello plugin provides a randomString function that generates random strings of a given length.
We've provided random_id_example.nf which has a local implementation of the same functionality.
Run the local function version
Take a look at the starting file:
#!/usr/bin/env nextflow

// Local function - must be copied to every pipeline that needs it
def randomString(int length) {
    def chars = 'ABCDEFGHIJKLMNOPQRSTUVWXYZabcdefghijklmnopqrstuvwxyz0123456789'
    def random = new Random()
    return (1..length).collect { chars[random.nextInt(chars.length())] }.join()
}

workflow {
    // Generate random IDs for each sample
    Channel.of('sample_A', 'sample_B', 'sample_C')
        | map { sample -> "${sample}_${randomString(8)}" }
        | view
}
Run it:
(Your random strings will be different!)
This works, but if you wanted to use randomString in another pipeline, you'd have to copy the function definition.
Replace with the plugin
Now let's replace our local function with the one from the nf-hello plugin.
Edit random_id_example.nf to import the function from the plugin instead of defining it locally:
#!/usr/bin/env nextflow

// Import function from plugin - no local definition needed
include { randomString } from 'plugin/nf-hello'

workflow {
    // Generate random IDs for each sample
    Channel.of('sample_A', 'sample_B', 'sample_C')
        | map { sample -> "${sample}_${randomString(8)}" }
        | view
}
#!/usr/bin/env nextflow

// Local function - must be copied to every pipeline that needs it
def randomString(int length) {
    def chars = 'ABCDEFGHIJKLMNOPQRSTUVWXYZabcdefghijklmnopqrstuvwxyz0123456789'
    def random = new Random()
    return (1..length).collect { chars[random.nextInt(chars.length())] }.join()
}

workflow {
    // Generate random IDs for each sample
    Channel.of('sample_A', 'sample_B', 'sample_C')
        | map { sample -> "${sample}_${randomString(8)}" }
        | view
}
Run it again with the -plugins flag to load the plugin:
Config vs command line
We introduced plugins using nextflow.config (section 2.2), but here we use the -plugins flag.
Both approaches work:
nextflow.config: Best for production pipelines where you want plugins locked to specific versions-pluginsflag: Handy for quick testing or trying out a plugin without modifying config files
For a real pipeline, you'd typically add the plugin to nextflow.config so it's always available.
The first run will download the plugin automatically. The output is the same, but now the function comes from a versioned, shareable plugin.
The key difference: one import line replaces the entire function definition.
Any pipeline can use nf-hello@0.5.0 and get the exact same randomString function.
Takeaway
Using plugins is straightforward: declare them in nextflow.config or load them with -plugins, then import their functions and use them in your workflows.
The plugin ecosystem extends Nextflow with powerful features like validation, cloud integration, and provenance tracking.
What's next?
Now that you understand how to use plugins, let's build our own.
3. Creating a plugin project
Official documentation
This section and those that follow cover plugin development essentials. For comprehensive details, see the official Nextflow plugin development documentation.
3.1. Using the Nextflow plugin create command
The easiest way to create a plugin is with the built-in command:
This scaffolds a complete plugin project. The first argument is the plugin name, and the second is your organization name (used for the package namespace).
Manual creation
You can also create plugin projects manually or use the nf-hello template on GitHub as a starting point.
3.2. Examine the generated project
Change into the plugin directory:
List the contents:
You should see:
.
├── build.gradle
├── COPYING
├── gradle
│   └── wrapper
│       ├── gradle-wrapper.jar
│       └── gradle-wrapper.properties
├── gradlew
├── Makefile
├── README.md
├── settings.gradle
└── src
    ├── main
    │   └── groovy
    │       └── training
    │           └── plugin
    │               ├── NfGreetingExtension.groovy
    │               ├── NfGreetingFactory.groovy
    │               ├── NfGreetingObserver.groovy
    │               └── NfGreetingPlugin.groovy
    └── test
        └── groovy
            └── training
                └── plugin
                    └── NfGreetingObserverTest.groovy

11 directories, 13 files
3.3. Understand settings.gradle
This simply sets the project name.
3.4. Understand build.gradle
Key sections in the build file:
plugins {
    id 'io.nextflow.nextflow-plugin' version '0.0.1-alpha4'
}

version = '0.1.0'

nextflowPlugin {
    nextflowVersion = '24.10.0'

    provider = 'training'
    className = 'training.plugin.NfGreetingPlugin'
    extensionPoints = [
        'training.plugin.NfGreetingExtension',
        'training.plugin.NfGreetingFactory'
    ]

    publishing {
        registry {
            url = 'https://nf-plugins-registry.dev-tower.net/api'
            authToken = project.findProperty('pluginRegistry.accessToken')
        }
    }
}
The nextflowPlugin block configures:
nextflowVersion: Minimum Nextflow version requiredprovider: Your name or organizationclassName: The main plugin class (uses your package name)extensionPoints: Classes providing extensions (functions, observers, etc.)publishing: Configuration for publishing to the plugin registry (optional)
Takeaway
The nextflow plugin create command scaffolds a complete project.
The build.gradle file configures the plugin metadata and dependencies.
What's next?
Let's implement our custom functions.
4. Implementing custom functions
4.1. The PluginExtensionPoint class
Functions are defined in classes that extend PluginExtensionPoint.
Open the extension file:
The template includes sample functions. Let's replace them with our greeting functions.
4.2. Create our functions
The template includes a simple sayHello function.
Let's replace it with our greeting manipulation functions.
Edit the file to replace the sayHello function with our three new functions:
Understanding the Groovy syntax
If this code looks unfamiliar, here's a breakdown of the key elements:
package training.plugin - Declares which package (folder structure) this code belongs to. This must match the directory structure.
import ... - Brings in code from other packages, similar to Python's import or R's library().
@CompileStatic - An annotation (marked with @) that tells Groovy to check types at compile time. This catches errors earlier.
class NfGreetingExtension extends PluginExtensionPoint - Defines a class that inherits from PluginExtensionPoint. The extends keyword means "this class is a type of that class."
@Override - Indicates we're replacing a method from the parent class.
@Function - The key annotation that makes a method available as a Nextflow function.
String reverseGreeting(String greeting) - A method that takes a String parameter and returns a String. In Groovy, you can often omit return - the last expression is returned automatically.
String name = 'World' - A parameter with a default value, just like in Python.
4.3. Understanding the @Function annotation
The @Function annotation marks a method as callable from Nextflow workflows:
Key requirements:
- Methods must be public: In Groovy, methods are public by default, so the
publickeyword is optional but shown here for clarity - Return type: Can be any serializable type (
String,List,Map, etc.) - Parameters: Can have any number of parameters, including default values:
@Function
public String decorateGreeting(String greeting, String prefix = ">>> ", String suffix = " <<<") {
    return "${prefix}${greeting}${suffix}"
}
Once defined, functions are available via the include statement:
4.4. The init() method
The init() method is called when the plugin loads:
@Override
void init(Session session) {
    // Access session configuration
    // Initialize resources
    // Set up state
}
You can access configuration via session.config.
Takeaway
Functions are defined with the @Function annotation in PluginExtensionPoint subclasses.
They become available to import in Nextflow workflows.
What's next?
Let's build and test our plugin.
5. Building and testing
Why do we need to build?
If you're used to scripting languages like Python, R, or even Nextflow's DSL, you might wonder why we need a "build" step at all. In those languages, you write code and run it directly.
Nextflow plugins are written in Groovy, which runs on the Java Virtual Machine (JVM). JVM languages need to be compiled before they can run - the human-readable source code is converted into bytecode that the JVM can execute.
The build process:
- Compiles your Groovy code into JVM bytecode
- Packages it into a JAR file (Java ARchive - like a ZIP of compiled code)
- Bundles metadata so Nextflow knows how to load the plugin
Don't worry - the build tools handle all this automatically. You just run make assemble and let Gradle do the work.
The plugin development cycle follows a simple pattern:
graph LR
    A[Write/Edit Code] --> B[make assemble]
    B --> C[make test]
    C --> D{Tests pass?}
    D -->|No| A
    D -->|Yes| E[make install]
    E --> F[Test in pipeline]
    F --> G{Works?}
    G -->|No| A
    G -->|Yes| H[Done!]
5.1. Build the plugin
The Makefile provides convenient commands:
Or directly with the Gradle wrapper:
What is ./gradlew?
The ./gradlew script is the Gradle wrapper - a small script included with the project that automatically downloads and runs the correct version of Gradle.
This means you don't need Gradle installed on your system.
The first time you run ./gradlew, it will download Gradle (which may take a moment), then run your command.
The make commands in the Makefile are just shortcuts that call ./gradlew for you.
Build output
The first time you run this, Gradle will download itself (this may take a minute):
Downloading https://services.gradle.org/distributions/gradle-8.14-bin.zip
...10%...20%...30%...40%...50%...60%...70%...80%...90%...100%

Welcome to Gradle 8.14!
...

Deprecated Gradle features were used in this build...

BUILD SUCCESSFUL in 23s
4 actionable tasks: 4 executed
Don't worry about the warnings!
- "Downloading gradle...": This only happens the first time. Subsequent builds are much faster.
- "Deprecated Gradle features...": This warning comes from the plugin template, not your code. It's safe to ignore.
- "BUILD SUCCESSFUL": This is what matters! Your plugin compiled without errors.
5.2. Write unit tests
Good plugins have tests. Tests verify that your code works correctly and help catch bugs when you make changes later.
What are unit tests?
Unit tests are small pieces of code that automatically check if your functions work correctly. Each test calls a function with known inputs and checks that the output matches what you expect.
For example, if you have a function that reverses strings, a test might check that reverse("Hello") returns "olleH".
Tests are valuable because:
- They catch bugs before users do
- They give you confidence to make changes without breaking things
- They serve as documentation showing how functions should be used
You don't need to write tests to use a plugin, but they're good practice for any code you plan to share or maintain.
The generated project includes a test for the Observer class, but we need to create a new test file for our extension functions.
Understanding Spock tests
The plugin template uses Spock, a testing framework for Groovy that reads almost like plain English. Here's the basic structure:
def 'should reverse a greeting'() {   // (1)!
    given:                             // (2)!
    def ext = new NfGreetingExtension()

    expect:                            // (3)!
    ext.reverseGreeting('Hello') == 'olleH'
}
- Test name in quotes - Describes what the test checks. Use plain English!
given:block - Set up what you need for the test (create objects, prepare data)expect:block - The actual checks. Each line should betruefor the test to pass
This structure makes tests readable: "Given an extension object, expect that reverseGreeting('Hello') equals 'olleH'."
Create the test file
Open it in your editor and add the following content:
5.3. Run the tests
Or:
Test output
Where are the test results? Gradle hides detailed output when all tests pass - "BUILD SUCCESSFUL" means everything worked! If any test fails, you'll see detailed error messages.
5.4. View the test report
To see detailed results for each test, you can view the HTML test report that Gradle generates.
Start a simple web server in the test report directory:
VS Code will prompt you to open the application in your browser. Click through to your test class to see individual test results:
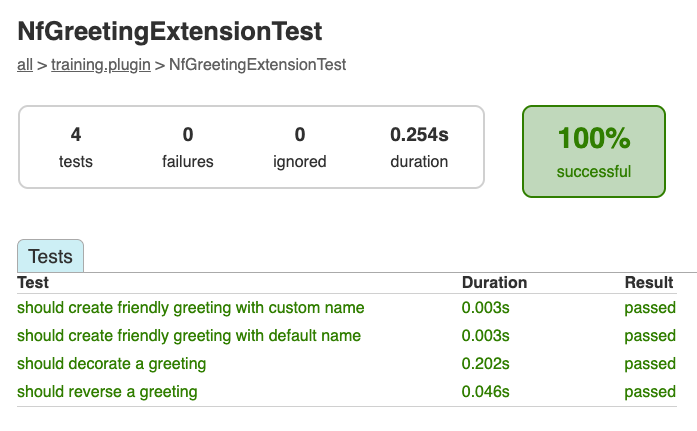
The report shows each test method, its duration, and whether it passed or failed. This confirms that all four of our greeting functions are being tested correctly.
Press Ctrl+C in the terminal to stop the server when you're done, then return to the plugin directory:
If the build fails
Build errors can be intimidating, but they usually point to a specific problem. Common issues include:
- Syntax errors: A missing bracket, quote, or semicolon. The error message usually includes a line number.
- Import errors: A class name is misspelled or the import statement is missing.
- Type errors: You're passing the wrong type of data to a function.
Read the error message carefully - it often tells you exactly what's wrong and where. If you're stuck, compare your code character-by-character with the examples.
5.5. Install locally
To use the plugin with Nextflow, install it to your local plugins directory:
This copies the plugin to ~/.nextflow/plugins/.
Takeaway
Use make assemble to compile and make test to run tests.
Install with make install to use the plugin locally.
What's next?
Let's use our plugin in a workflow.
6. Using your plugin
6.1. Configure the plugin
Go back to the pipeline directory:
Edit nextflow.config to add the plugins block with your plugin and version:
Version required for local plugins
When using locally installed plugins, you must specify the version (e.g., nf-greeting@0.1.0).
Published plugins in the registry can use just the name.
6.2. Import and use functions
We provided a simple greeting pipeline in main.nf that reads greetings from a CSV file and writes them to output files.
Take a quick look at it:
#!/usr/bin/env nextflow

params.input = 'greetings.csv'

process SAY_HELLO {
    input:
        val greeting
    output:
        stdout
    script:
    """
    echo '$greeting'
    """
}

workflow {
    greeting_ch = channel.fromPath(params.input)
                        .splitCsv(header: true)
                        .map { row -> row.greeting }
    SAY_HELLO(greeting_ch)
    SAY_HELLO.out.view { result -> "Output: ${result.trim()}" }
}
Run it to see the basic output:
Now let's enhance it to use our plugin functions.
Edit main.nf to import and use the custom functions:
The key changes:
- Lines 4-5: Import our plugin functions using
include { function } from 'plugin/plugin-name' - Lines 17-18: Use
decorateGreeting()inside the process script to transform the greeting before output - Lines 28-30: Use
reverseGreeting()in amapoperation to transform channel items in the workflow
This demonstrates that plugin functions work in both contexts - inside process definitions (where they run on compute nodes) and in workflow channel operations (where they run on the Nextflow head process).
6.3. Run the pipeline
Output
N E X T F L O W   ~  version 25.04.3

Launching `main.nf` [elated_marconi] DSL2 - revision: cd8d52c97c

Pipeline is starting! 🚀
executor >  local (5)
[fe/109754] process > SAY_HELLO (5) [100%] 5 of 5 ✔
Reversed: olleH
Reversed: ruojnoB
Reversed: àloH
Reversed: oaiC
Reversed: ollaH
Decorated: *** Hello ***
Decorated: *** Bonjour ***
Decorated: *** Holà ***
Decorated: *** Ciao ***
Decorated: *** Hallo ***
Pipeline complete! 🎉
The "Pipeline is starting!" and "Pipeline complete!" messages come from the NfGreetingObserver trace observer that was included in the generated plugin template.
The decorateGreeting() function wraps each greeting with decorative markers, and reverseGreeting() shows the reversed strings - all powered by our plugin functions!
Takeaway
Import plugin functions with include { function } from 'plugin/plugin-id'.
Once imported, you can use them anywhere:
- In process scripts - like
decorateGreeting()transforming data before output - In workflow operations - like
reverseGreeting()inside amapclosure
What's next?
Let's explore other extension types.
7. Trace observers
In section 1.1, we saw that plugins can provide many types of extensions. So far we've implemented custom functions. Now let's explore trace observers, which let you hook into workflow lifecycle events.
7.1. Understanding the existing trace observer
Remember the "Pipeline is starting! 🚀" message when you ran the pipeline?
That came from the NfGreetingObserver class in your plugin.
Look at the observer code:
This observer hooks into workflow lifecycle events. Trace observers can respond to many events:
| Method | When it's called |
|---|---|
onFlowCreate |
Workflow starts |
onFlowComplete |
Workflow finishes |
onProcessStart |
A task begins execution |
onProcessComplete |
A task finishes |
onProcessCached |
A cached task is reused |
onFilePublish |
A file is published |
This enables powerful use cases like custom reports, Slack notifications, or metrics collection.
7.2. Try it: Add a task counter observer
Rather than modifying the existing observer, let's create a new one that counts completed tasks. This reinforces the concepts while doing something different.
Create a new file:
Add the following content:
Let's break down what this code does:
- Lines 4-6: Import the classes we need -
TaskHandlerrepresents a running task,TraceObserveris the interface we implement, andTraceRecordcontains task execution metadata (timing, resources, etc.) - Line 11:
@CompileStaticimproves performance by enabling static compilation - Line 12:
implements TraceObservermeans our class must provide implementations for the observer lifecycle methods - Line 14: We declare a private instance variable to track state across callbacks - each observer instance maintains its own count
- Lines 16-19:
onProcessCompleteis called every time a task finishes successfully. Thehandlerparameter gives access to the task's process name, work directory, etc. Thetraceparameter contains execution metrics. We simply increment our counter and print the running total. - Lines 21-23:
onFlowCompleteis called once when the entire workflow finishes, giving us a chance to print the final summary
Now we need to register this observer with the plugin.
The NfGreetingFactory creates observers - take a look at it:
@CompileStatic
class NfGreetingFactory implements TraceObserverFactory {

    @Override
    Collection<TraceObserver> create(Session session) {
        return List.<TraceObserver>of(new NfGreetingObserver())
    }
}
Edit NfGreetingFactory.groovy to add our new observer:
Groovy list syntax
We've replaced the Java-style List.<TraceObserver>of(...) with Groovy's simpler list literal [...].
Both return a Collection, but the Groovy syntax is more readable when adding multiple items.
Rebuild and reinstall:
Run the pipeline with -ansi-log false to see all observer output:
N E X T F L O W  ~  version 25.04.3
Launching `main.nf` [pensive_engelbart] DSL2 - revision: 85fefd90d0
Pipeline is starting! 🚀
Reversed: olleH
Reversed: ruojnoB
Reversed: àloH
Reversed: oaiC
Reversed: ollaH
[be/bd8e72] Submitted process > SAY_HELLO (2)
[5b/d24c2b] Submitted process > SAY_HELLO (1)
[14/1f9dbe] Submitted process > SAY_HELLO (3)
Decorated: *** Bonjour ***
Decorated: *** Hello ***
[85/a6b3ad] Submitted process > SAY_HELLO (4)
📊 Tasks completed so far: 1
📊 Tasks completed so far: 2
Decorated: *** Holà ***
📊 Tasks completed so far: 3
Decorated: *** Ciao ***
[3c/be6686] Submitted process > SAY_HELLO (5)
📊 Tasks completed so far: 4
Decorated: *** Hallo ***
📊 Tasks completed so far: 5
Pipeline complete! 👋
📈 Final task count: 5
Why -ansi-log false?
By default, Nextflow's ANSI progress display overwrites previous lines.
Using -ansi-log false shows all output sequentially, which is useful when testing observers that print messages during execution.
Takeaway
Trace observers hook into workflow lifecycle events like onFlowCreate, onProcessComplete, and onFlowComplete.
They're useful for custom logging, metrics collection, notifications, and reporting.
What's next?
Let's see how plugins can read configuration from nextflow.config.
8. Configuration
8.1. Configuration-driven behavior
Plugins can read configuration from nextflow.config, letting users customize behavior.
The session.config.navigate() method reads nested configuration values:
// Read 'greeting.enabled' from nextflow.config, defaulting to true
final enabled = session.config.navigate('greeting.enabled', true)
This lets users control plugin behavior without modifying code:
8.2. Try it: Make the task counter configurable
Let's add configuration options to:
- Enable/disable the entire greeting plugin
- Control whether per-task counter messages are shown
First, edit TaskCounterObserver.groovy to accept a configuration flag:
The key changes:
- Line 14: Add a
verboseflag to control whether per-task messages are printed - Lines 17-19: Constructor that accepts the verbose setting
- Lines 24-26: Only print per-task messages if
verboseis true
Now update NfGreetingFactory.groovy to read the configuration and pass it to the observer:
The factory now:
- Lines 33-34: Reads the
greeting.enabledconfig and returns early if disabled - Line 36: Reads the
greeting.taskCounter.verboseconfig (defaulting totrue) - Line 39: Passes the verbose setting to the
TaskCounterObserverconstructor
Rebuild and reinstall the plugin:
Now update nextflow.config to disable the per-task messages:
Run the pipeline and observe that only the final count appears:
N E X T F L O W  ~  version 25.04.3
Launching `main.nf` [stoic_wegener] DSL2 - revision: 63f3119fbc
Pipeline is starting! 🚀
Reversed: olleH
Reversed: ruojnoB
Reversed: àloH
Reversed: oaiC
Reversed: ollaH
[5e/9c1f21] Submitted process > SAY_HELLO (2)
[20/8f6f91] Submitted process > SAY_HELLO (1)
[6d/496bae] Submitted process > SAY_HELLO (4)
[5c/a7fe10] Submitted process > SAY_HELLO (3)
[48/18199f] Submitted process > SAY_HELLO (5)
Decorated: *** Hello ***
Decorated: *** Bonjour ***
Decorated: *** Holà ***
Decorated: *** Ciao ***
Decorated: *** Hallo ***
Pipeline complete! 👋
📈 Final task count: 5
8.3. Try it: Make the decorator configurable
Let's make the decorateGreeting function use configurable prefix/suffix.
Edit NfGreetingExtension.groovy:
Rebuild and reinstall the plugin:
To see the decorated output, update main.nf to change the output message:
| main.nf (workflow section) | |
|---|---|
Now update nextflow.config to customize the decoration:
Run the pipeline and observe the changed decoration style:
N E X T F L O W  ~  version 25.04.3
Launching `main.nf` [nostalgic_leibniz] DSL2 - revision: 7d4c977882
Pipeline is starting! 🚀
Reversed: olleH
Reversed: ruojnoB
Reversed: àloH
Reversed: oaiC
Reversed: ollaH
[ef/0979a4] Submitted process > SAY_HELLO (2)
[8e/c79e5e] Submitted process > SAY_HELLO (1)
[dc/c5e8c2] Submitted process > SAY_HELLO (4)
Decorated with custom prefix: >>> Bonjour <<<
Decorated with custom prefix: >>> Hello <<<
[b9/47d0b8] Submitted process > SAY_HELLO (3)
Decorated with custom prefix: >>> Ciao <<<
[89/846018] Submitted process > SAY_HELLO (5)
Decorated with custom prefix: >>> Holà <<<
Decorated with custom prefix: >>> Hallo <<<
Pipeline complete! 👋
📈 Final task count: 5
Takeaway
Plugins can read configuration using session.config.navigate(), letting users customize behavior without modifying code.
What's next?
Let's briefly cover some advanced extension types, then look at how to share your plugin.
9. Advanced extension types
Some extension types require significant infrastructure or deep Nextflow knowledge to implement. This section provides a conceptual overview - for implementation details, see the Nextflow plugin documentation.
9.1. Executors
Executors define how tasks are submitted to compute resources:
- AWS Batch, Google Cloud Batch, Azure Batch
- Kubernetes, SLURM, PBS, LSF
- Creating a custom executor is complex and typically done by platform vendors
9.2. Filesystems
Filesystems define how files are accessed:
- S3, Google Cloud Storage, Azure Blob
- Custom storage systems
- Creating a custom filesystem requires implementing Java NIO interfaces
Takeaway
Executors and filesystems are advanced extension types typically created by platform vendors or for specialized infrastructure needs.
What's next?
Let's look at how to share your plugin with others.
10. Distributing your plugin
Once your plugin is working locally, you have two options for sharing it:
| Distribution method | Use case | Approval required |
|---|---|---|
| Public registry | Open source plugins for the community | Yes - name must be claimed |
| Internal hosting | Private/proprietary plugins within an organization | No |
10.1. Publishing to the public registry
The Nextflow plugin registry is the official way to share plugins with the community.
Plugin registry
The Nextflow plugin registry is currently in public preview. See the Nextflow documentation for the latest details.
Claim your plugin name
Before publishing, claim your plugin name in the registry:
- Go to the Nextflow plugin registry
- Sign in with your GitHub account
- Claim your plugin name (e.g.,
nf-greeting)
You can claim a name before the plugin exists - this reserves it for you.
Configure API credentials
Create a Gradle properties file to store your registry credentials:
Add your API key (obtain this from the registry after signing in):
Keep your API key secret
Don't commit this file to version control.
The ~/.gradle/ directory is outside your project, so it won't be included in your repository.
Prepare for release
Before publishing, ensure your plugin is ready:
- Update the version in
build.gradle(use semantic versioning) - Run tests to ensure everything works:
make test - Update documentation in your README
Publish to the registry
Run the release command from your plugin directory:
This builds the plugin and publishes it to the registry in one step.
What make release does
The make release command runs ./gradlew publishPlugin, which:
- Compiles your plugin code
- Runs tests
- Packages the plugin as a JAR file
- Uploads to the Nextflow plugin registry
- Makes it available for users to install
Using published plugins
Once published, users can install your plugin without any local setup:
plugins {
    id 'nf-greeting'        // Latest version
    id 'nf-greeting@1.0.0'  // Specific version (recommended)
}
Nextflow automatically downloads the plugin from the registry on first use.
10.2. Internal distribution
Organizations often need to distribute plugins internally without using the public registry. This is useful for proprietary plugins, plugins under development, or plugins that shouldn't be publicly available.
What internal distribution provides
Internal distribution uses a simple plugins.json file that tells Nextflow where to download plugin ZIP files.
This is not a full self-hosted registry - there's no web UI, search, or automatic updates.
A full self-hosted registry solution may be available in the future.
Build the plugin ZIP
The ZIP file will be at build/distributions/:
Host the files
Host the ZIP file(s) somewhere accessible to your users:
- Internal web server
- S3 bucket (with appropriate access)
- GitHub releases (for private repos)
- Shared network drive (using
file://URLs)
Create the plugins.json index
Create a plugins.json file that describes available plugins:
[
  {
    "id": "nf-myplugin",
    "releases": [
      {
        "version": "1.0.0",
        "url": "https://internal.example.com/plugins/nf-myplugin-1.0.0.zip",
        "date": "2025-01-09T10:00:00Z",
        "sha512sum": "5abe4cbc643ca0333cba545846494b17488d19d17...",
        "requires": ">=24.04.0"
      }
    ]
  }
]
Host this file alongside your plugin ZIPs (or anywhere accessible).
plugins.json field reference
| Field | Description |
|---|---|
id |
Plugin identifier (e.g., nf-myplugin) |
version |
Semantic version string |
url |
Direct download URL to the plugin ZIP |
date |
ISO 8601 timestamp |
sha512sum |
SHA-512 checksum of the ZIP file |
requires |
Minimum Nextflow version (e.g., >=24.04.0) |
Configure Nextflow to use your index
Set the environment variable before running Nextflow:
Then use the plugin as normal:
Setting the variable permanently
Add the export to your shell profile (~/.bashrc, ~/.zshrc) or set it in your CI/CD pipeline configuration.
10.3. Versioning best practices
Follow semantic versioning for your releases:
| Version change | When to use | Example |
|---|---|---|
| MAJOR (1.0.0 → 2.0.0) | Breaking changes | Removing a function, changing return types |
| MINOR (1.0.0 → 1.1.0) | New features, backward compatible | Adding a new function |
| PATCH (1.0.0 → 1.0.1) | Bug fixes, backward compatible | Fixing a bug in existing function |
Takeaway
Use the public registry for open source plugins (requires claiming a name).
For internal distribution, host plugin ZIPs and a plugins.json index, then set NXF_PLUGINS_TEST_REPOSITORY.
Use semantic versioning to communicate changes to users.
What's next?
Let's summarize what we've learned.
Summary
Plugin development checklist
- Java 17+ installed
- Create project with
nextflow plugin create <name> <org> - Implement extension class with
@Functionmethods - Optionally add
TraceObserverimplementations for workflow events - Write unit tests
- Build with
make assemble - Install with
make install - Enable in
nextflow.configwithplugins { id 'plugin-id' } - Import functions with
include { fn } from 'plugin/plugin-id'
Key code patterns
Function definition:
Plugin configuration:
nextflowPlugin {
    provider = 'my-org'
    className = 'my.org.MyPlugin'
    extensionPoints = ['my.org.MyExtension']
}
Using in workflows:
include { myFunction } from 'plugin/my-plugin'

workflow {
    channel.of('a', 'b', 'c')
        .map { item -> myFunction(item) }
        .view()
}
Extension point summary
| Type | Annotation | Purpose |
|---|---|---|
| Function | @Function |
Callable from workflows |
Additional resources
Official documentation:
- Using plugins - comprehensive guide to installing and configuring plugins
- Developing plugins - detailed plugin development reference
Plugin discovery:
- Nextflow Plugin Registry - browse and discover available plugins
- Plugin registry docs - registry documentation
Examples and references:
- nf-hello - simple example plugin (great starting point)
- Nextflow plugins repository - collection of official plugins for reference
What's next?
Congratulations on completing this side quest!
If you completed sections 1-2, you now know how to discover, configure, and use existing plugins to extend your Nextflow pipelines. This knowledge will help you leverage the growing ecosystem of community plugins.
If you completed sections 3-10, you've also learned how to create your own plugins, implementing custom functions, trace observers, and more. Plugin development opens up powerful possibilities for:
- Sharing reusable functions across your organization
- Integrating with external services and APIs
- Custom monitoring and reporting
- Supporting new execution platforms
Whether you're using existing plugins or building your own, you now have the tools to extend Nextflow beyond its core capabilities.
Return to the Side Quests menu to continue your training journey.